N100小主机 |
您所在的位置:网站首页 › bios开启sriov 核显代码43 › N100小主机 |
N100小主机
N100小主机 ——显卡虚拟化及虚拟机设置
2023-11-27 19:27:07
15点赞
109收藏
29评论
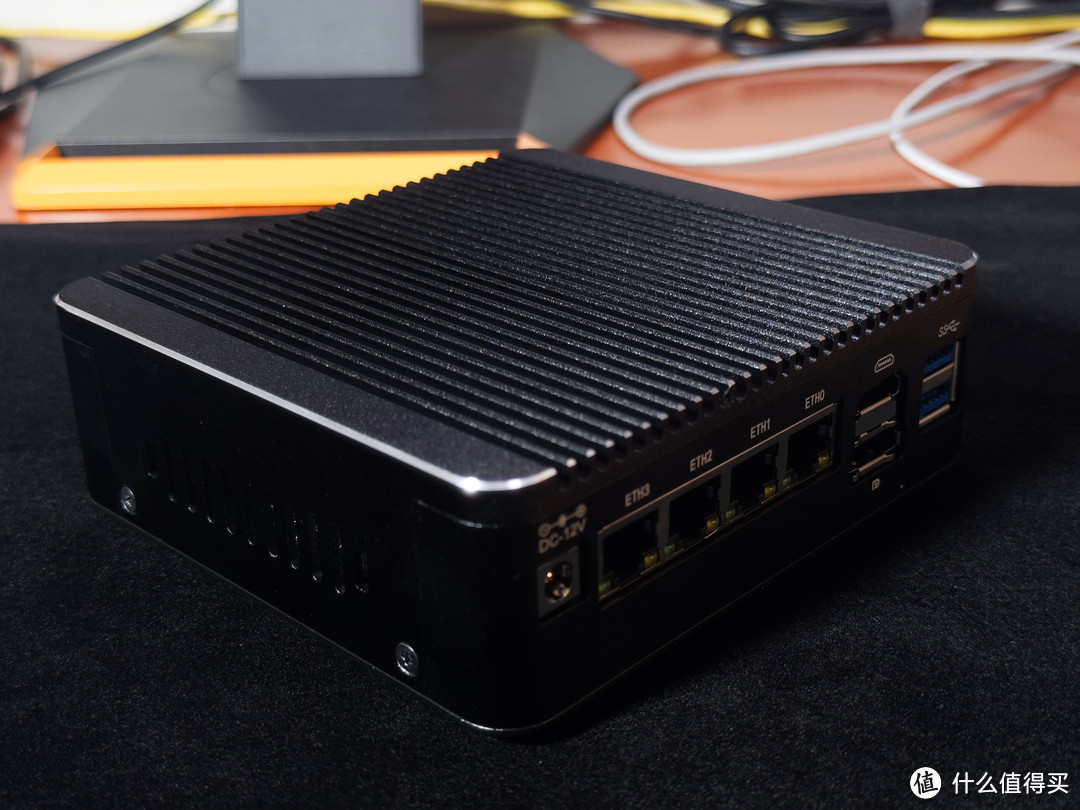 N100 N100今天继续更新双十一入手N100小主机玩转指南,之所以选择N100小主机:就是冲着Intel 11 代CPU以后的显卡都是支持显卡虚拟化的,目前还在测试中,所以需要编译内核才能使用。 之前的文章已经分享过如何操作10代级以前的CPU显卡只能用GVT技术GPU SR-IOV guest configure(显卡虚拟化:虚拟机相关设置)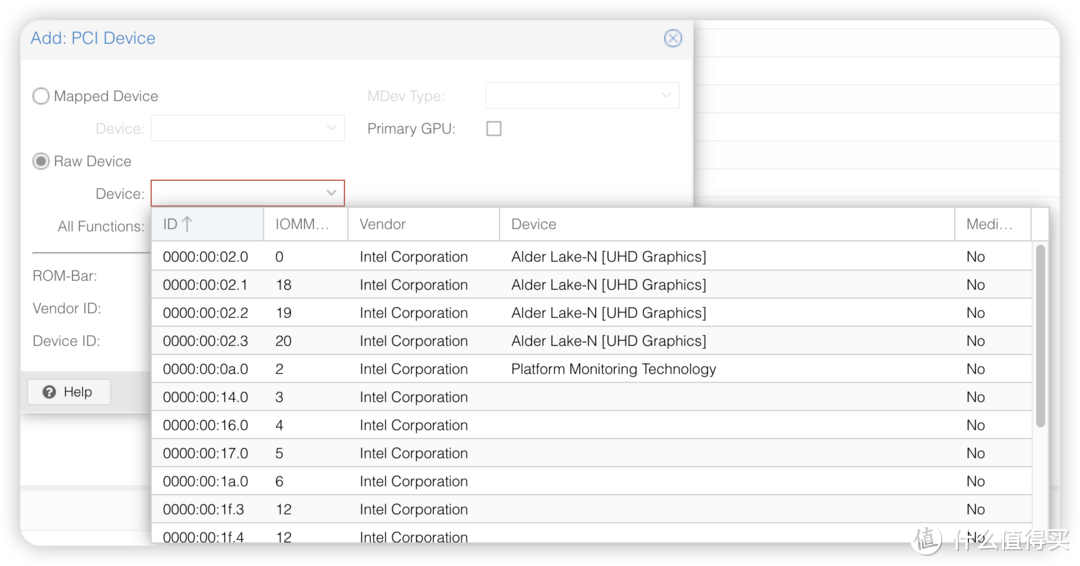 可添加显卡 可添加显卡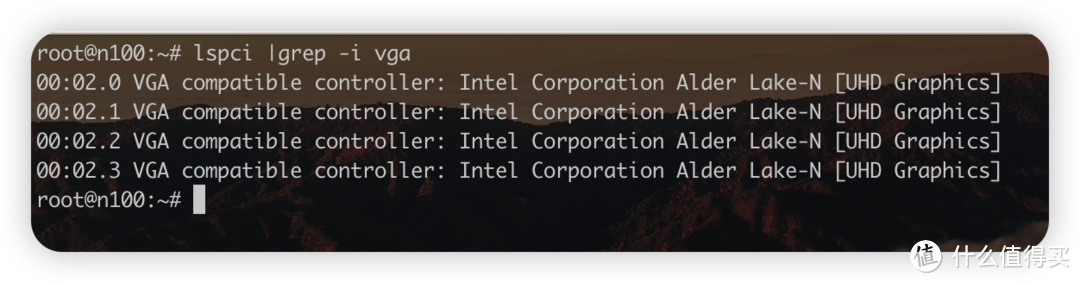 虚拟显卡检查Linux Guest Configure (Linux 虚拟机设置) 虚拟显卡检查Linux Guest Configure (Linux 虚拟机设置)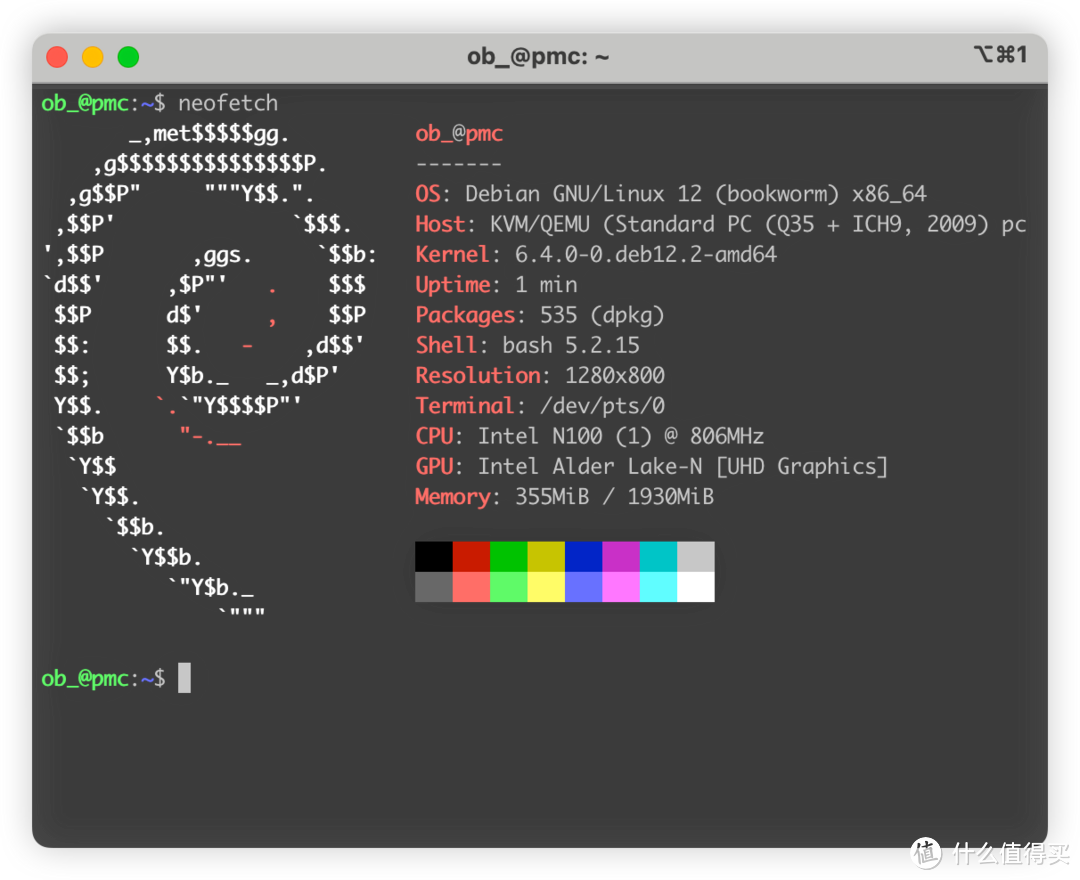 sugesst your guest kernel >= 6.2 ( 建议内核版本 >= 6.2 ) disable secure boot ( 关闭安全启动 )  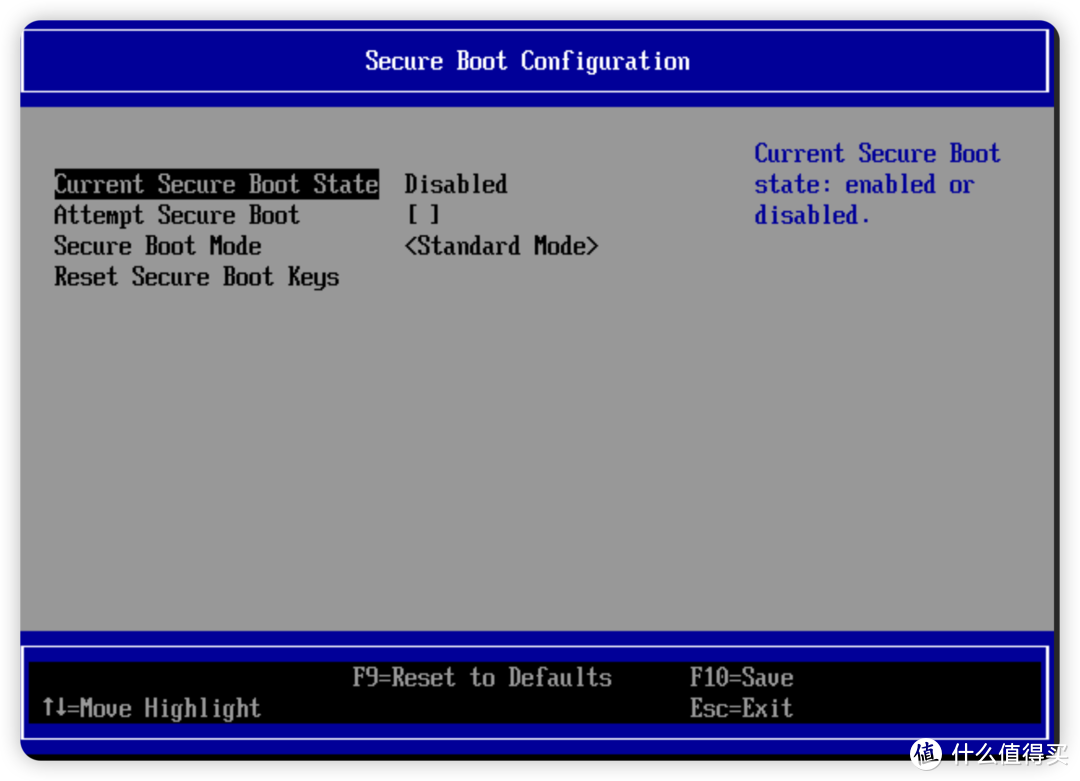 关闭安全启动 关闭安全启动must use Q35 chip (必须使用q35芯片组) Disable balloon (关闭内存共享) Must use OVMF UEFI ( 必须使用UEFI启动 ) Add SR-IOV gpu after install SR-IOV i915 driver (安装驱动以后再添加虚拟显卡)  N100I will be use debian 12 to do this ( 接下来我用 Debian 12 代号 bookworm 来演示 ) N100I will be use debian 12 to do this ( 接下来我用 Debian 12 代号 bookworm 来演示 )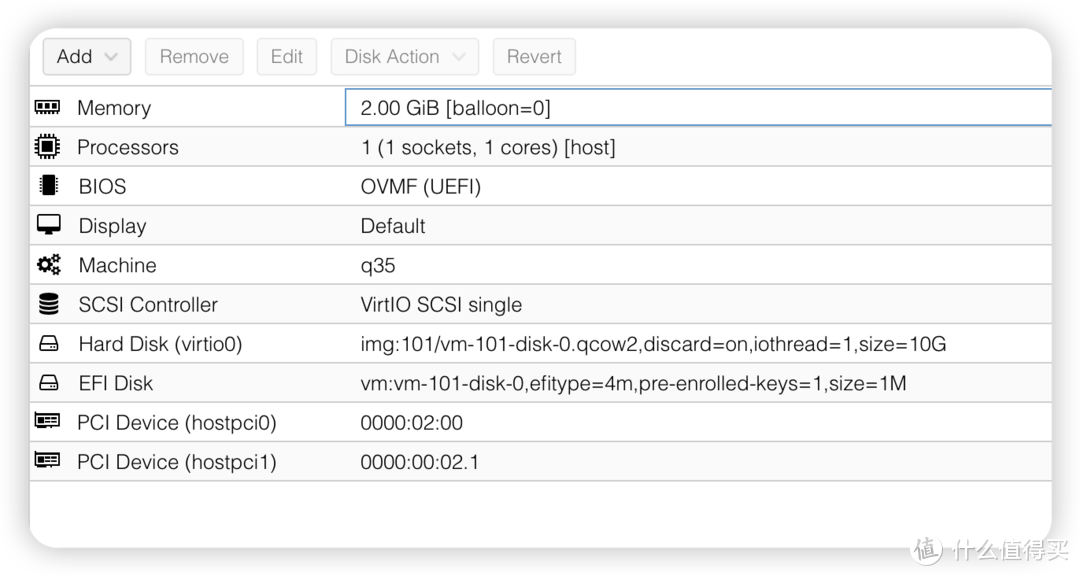 N100 Linux Guest N100 Linux GuestAdd backports sources (添加 backports 源) because debian 12 default kernel 6.1,so need install new kernel (因为 debian 12 默认内核版本较低,需要添加 backports 源,安装较新的内核,我测试的版本 6.4 可用) 更改适合你网络情况的镜像, I use ustc mirrors! echo "deb http://mirrors.ustc.edu.cn/debian bookworm-backports main non-free-firmware" >> /etc/apt/sources.list Update your system 更新你的系统 # apt update install new kernel 安装新内核 # apt install linux-headers-6.4.0-0.deb12.2-amd64 更新 initramfs # update-initramfs -u -k all 重启 # reboot install i915 sriov drivers 接下来打 i915 驱动打补丁git sources 下载源码 cd /usr/src/ git clone https://github.com/strongtz/i915-sriov-dkms i915-sriov-dkms-6.4 edit file 编辑源文件 edit /usr/src/i915-sriov-dkms-6.4/dkms.conf with the following: PACKAGE_NAME="i915-sriov-dkms" PACKAGE_VERSION="6.4" start dkms 开始打补丁 dkms install --force -m i915-sriov-dkms -v 6.4 edit kernel cmdline 编辑内核参数 edit /etc/default/grub with the following: GRUB_CMDLINE_LINUX_DEFAULT="quiet i915.enable_guc=3" update initramfa 更新 initramfs # update-grub # update-initramfs -u poweroff 关机 # poweroff Guest add SR-IOV iGpu 虚拟机添加虚拟显卡boot your guest 启动虚拟机 check 检查是否工作  显卡检查 显卡检查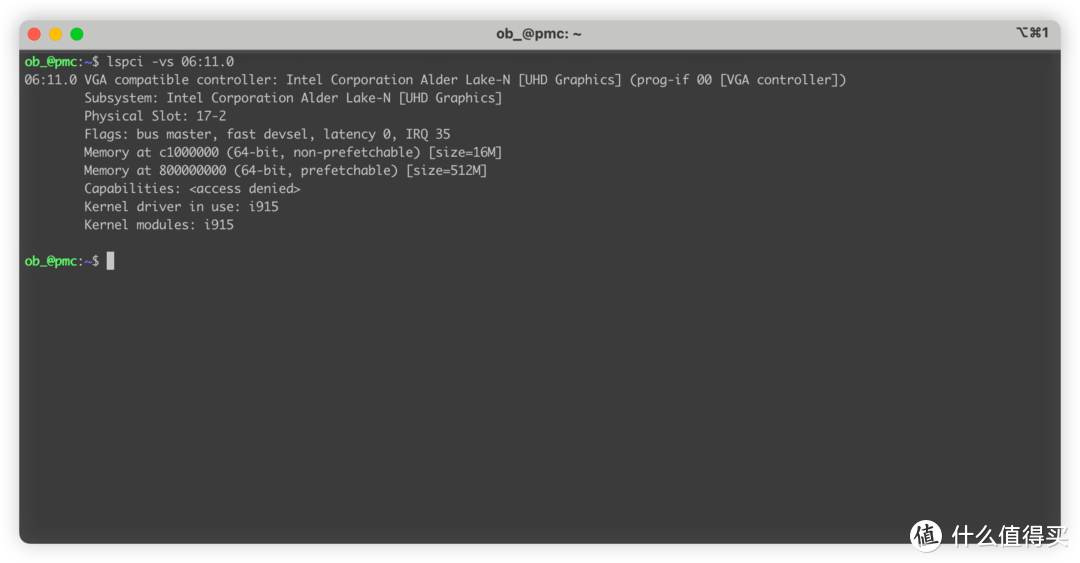 i915 i915Running in SR-IOV VF mode 说明已经工作在 sr-iov 模式了! # dmesg | grep i915 [ 0.000000] Command line: BOOT_IMAGE=/vmlinuz-6.4.0-0.deb12.2-amd64 root=/dev/mapper/pmc--vg-root ro quiet i915.enable_guc=3 [ 0.017516] Kernel command line: BOOT_IMAGE=/vmlinuz-6.4.0-0.deb12.2-amd64 root=/dev/mapper/pmc--vg-root ro quiet i915.enable_guc=3 [ 3.279578] i915: loading out-of-tree module taints kernel. [ 3.279625] i915: module verification failed: signature and/or required key missing - tainting kernel [ 3.807172] i915 0000:06:11.0: Running in SR-IOV VF mode [ 3.813391] i915 0000:06:11.0: [drm] GT0: GUC: interface version 0.1.0.0 [ 3.823986] i915 0000:06:11.0: [drm] VT-d active for gfx access [ 3.824015] i915 0000:06:11.0: [drm] Using Transparent Hugepages [ 3.828662] i915 0000:06:11.0: [drm] GT0: GUC: interface version 0.1.0.0 [ 3.840880] i915 0000:06:11.0: GuC firmware PRELOADED version 1.0 submission:SR-IOV VF [ 3.840886] i915 0000:06:11.0: HuC firmware PRELOADED [ 3.846126] i915 0000:06:11.0: [drm] Protected Xe Path (PXP) protected content support initialized [ 3.846135] i915 0000:06:11.0: [drm] PMU not supported for this GPU. [ 3.846307] [drm] Initialized i915 1.6.0 20201103 for 0000:06:11.0 on minor 1 lspci | grep -i vga 00:01.0 VGA compatible controller: Device 1234:1111 (rev 02) 06:11.0 VGA compatible controller: Intel Corporation Alder Lake-N [UHD Graphics] done 完成 ✅ Windows Guest 设置 —— Win10 为例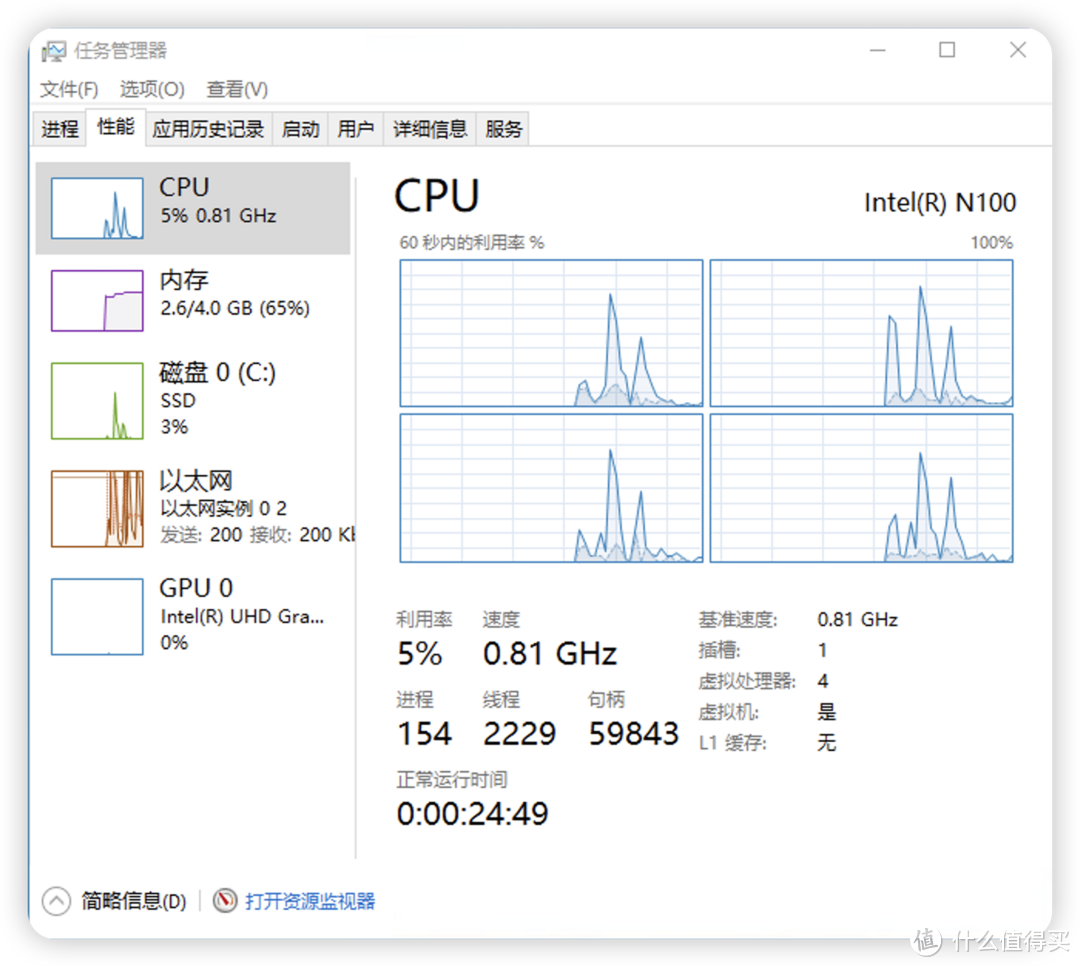 install win10 guest 正常安装虚拟机 you can add SR-IOV gpu 可以添加虚拟显卡 cpu 必须 host 模式 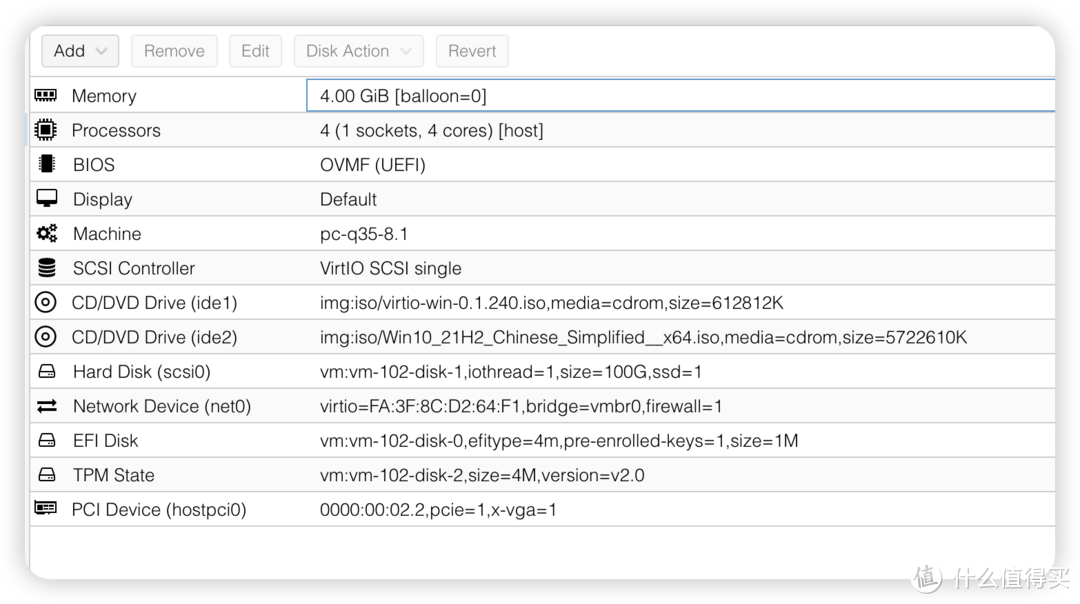 配置格式 配置格式disable balloon 关闭内存共享 OVMF UEFI boot 必须使用 UEFI 启动 q35 chips 必须使用q35芯片组 SR-IOV GPU could be set primary GPU after install intel gpu drivers 安装驱动以后才能设置成主显卡,注意此时的vnc就不可用了,搞好网络设置和 rdp 再这么干 . SR-IOV GPU must set pci-Express 注意:如果遇到 43 bug,禁用 igpu 显卡再重新启用可以解决。 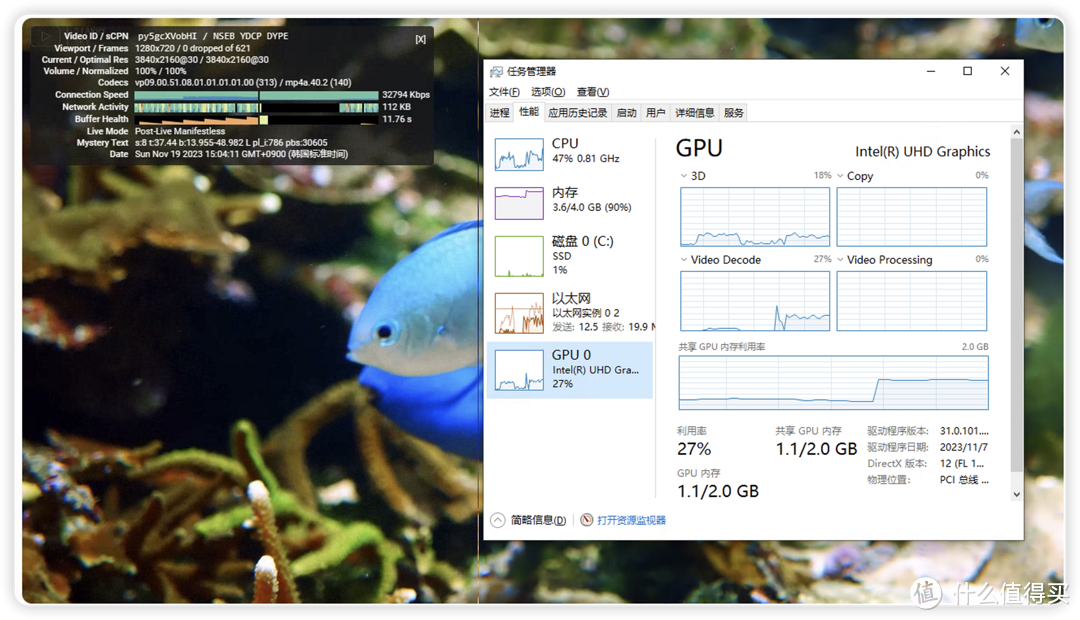 安装好虚拟机以后 ,进去设置好远程桌面,装好显卡驱动,就完成了! After installed windows vm, must set rd desktop or other remote desk, then install new intel gpu driver. 感谢阅读欢迎点评! 加入圈子讨论! 作者声明本文无利益相关,欢迎值友理性交流,和谐讨论~ 
|
【本文地址】
今日新闻 |
点击排行 |
|
推荐新闻 |
图片新闻 |
|
专题文章 |